
Restoring a Victorian house means repairing the building with the materials and methods it was built with, keeping the original features that give it character, and adding modern comfort in ways that don’t fight the structure. The work follows a fixed order: make it weathertight, sort the damp and the structure, run the services, and only then get to the plaster, windows, floors and decoration everyone is impatient to reach.
Most people start at the wrong end. They pull down a ceiling, strip the wallpaper, order a kitchen, and six months later find the bay window is dropping and the back wall is wet. We’ve been called into a fair few Nottingham terraces at exactly that point. This guide sets out the order that avoids it, what each stage involves, roughly what it costs, and where the money and the heartache tend to go.
Table of Contents
What restoring a Victorian house actually means (and how it differs from renovating)
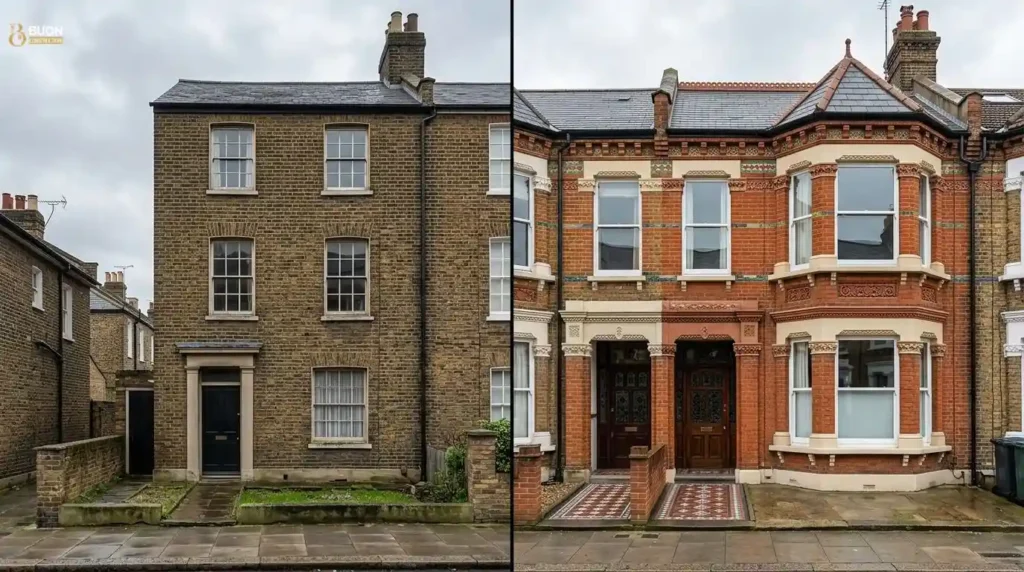
Restoration keeps and repairs what is original. Renovation replaces things to modernise. Almost every real project is a mix of the two, but the mindset matters: a restorer asks “can this be saved?” before asking “what shall I put in instead?” That one habit decides whether you end up with a Victorian house or a modern house wearing a Victorian front.
How to tell what you’ve got
Victorian covers 1837 to 1901, and a house from 1845 behaves very differently from one built in 1895.
Early Victorian houses are plainer, with flatter fronts, smaller window panes and often no damp-proof course at all. From the late 1870s onwards, houses built under the new byelaws usually have a slate or engineering-brick damp-proof course, bigger sash panes (glass got much cheaper once the glass tax went in 1845), decorative brick banding, and the bay windows most people picture. If your house has a bay, a tiled hallway and a slate DPC, you’re almost certainly in that later group.
Type matters as well. Terraces share walls and roofs with neighbours, which brings the Party Wall Act into play and means your damp problem can be their leaking gutter. Semis and villas, of the kind you see around Mapperley Park, give you more freedom but more roof, more brickwork and more windows to look after.
Restore, repair or replace? The decision rule for every feature
The rule we work to is simple. If it’s original and it can be repaired, repair it. Replace only when something is beyond economic repair or unsafe. A sash window with a rotten bottom rail is a repair. A sash window where the box frame has gone soft all the way round is a replacement. The table later in this guide runs through the common features one by one.
Original features carry real value in period areas. Buyers and agents price in a working fireplace, a tiled hall and intact cornicing, and once they’re gone you can’t get the originals back.
Before you start: surveys, permissions and budget
Every Victorian restoration should begin with three things: a proper survey, a clear answer on permissions, and a budget with a contingency you don’t touch. Skip any one of them and the project will find a way to remind you.
Get a Level 3 building survey, not a valuation
A RICS Level 3 Building Survey is the one you want for a Victorian house. The lender’s valuation tells you what the house is worth, not what’s wrong with it. A Level 3 report will get into the roof space, lift drain covers, look for movement at the bay, and tell you where the damp actually comes from. Expect to pay somewhere in the region of £800 to £1,500 depending on the size of the house, and treat it as the cheapest money you’ll spend.
Two additions are worth it on most older houses. First, a CCTV drain survey, because cracked Victorian clay drains are one of the most common hidden sources of “rising damp” that isn’t rising damp at all. Second, an independent damp and timber survey from a surveyor who doesn’t also sell the treatment. Free surveys from damp-proofing companies have a habit of finding exactly what they sell.
If you’re still deciding whether to buy, check the detailed blog on the pros and cons of buying a property to renovate that covers the questions to ask before you commit.
Do you need planning permission or listed building consent?
For most unlisted Victorian houses, repair and internal restoration needs no planning permission. Three situations change that.
Listed buildings need listed building consent for anything that affects their character, inside or out, and that includes replacing windows, removing a fireplace or changing internal walls. Doing it without consent is a criminal offence, so speak to the conservation officer early.
Conservation areas restrict demolition and some external changes, and often protect trees. Repairs like-for-like are usually fine; changing the look of the front elevation may not be.
Article 4 directions are the one that catches people out. A council can remove permitted development rights in a particular area, which means replacing front windows, doors or roof materials suddenly needs an application. Check your council’s planning portal for your street before you order anything. In Nottingham, the City Council publishes its conservation areas and Article 4 directions online.
Building Regulations apply whatever the planning position. Electrical work, replacement windows, structural alterations, new heating and any insulation all need to comply and, in most cases, be certified. If you’re touching a shared wall in a terrace, removing a chimney breast for example, the Party Wall Act applies and your neighbours need formal notice.
DIY, general builder or heritage specialist: who does what
A Victorian restoration usually needs all three. The trick is knowing where the lines fall.
DIY suits stripping out, careful paint removal, cleaning tiles and floorboards, decorating, and simple joinery. It doesn’t suit anything structural, anything with lime, or anything involving gas or electrics.
A good general builder handles the roof, the structure, the drains, extensions and the co-ordination of everyone else. What you’re looking for is a builder who has worked on Victorian houses before and knows why they’re different, because the same contractor who does excellent work on a 1990s semi can cause real damage on an 1880s terrace by using the wrong materials. Our home renovation team in Nottingham works on Victorian properties across the city, and these ten questions to ask before hiring a renovation company will help you judge anyone you’re considering.
Specialists earn their fee on lime plastering, sash window repair, stained glass, cast iron and anything a structural engineer needs to design. Ask to see period work they’ve done, not just any work.
The right order of works for a Victorian restoration
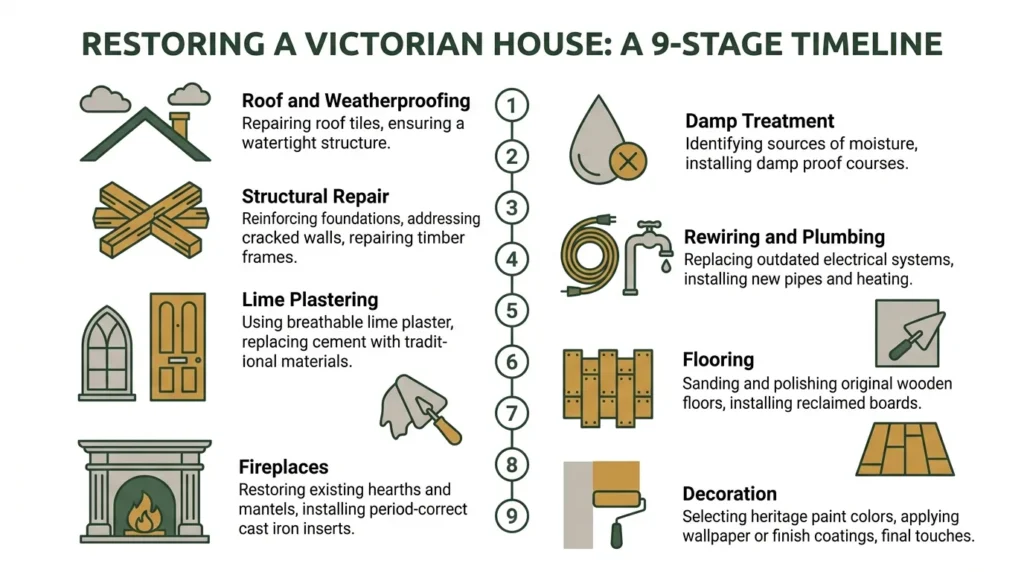
Work from the outside in and from the top down. That single principle prevents most of the expensive mistakes we see.
- Make the building weathertight: roof, chimneys, gutters, repointing
- Diagnose and fix the damp with breathable materials
- Repair the structure and timber
- Rewire, re-plumb and install heating
- Repair or replace plaster and ceilings in lime
- Repair and draught-proof windows and doors
- Repair floors and original tiles
- Restore fireplaces and chimney breasts
- Decorate with breathable paints
Step 1: Make it weathertight: roof, chimneys, gutters and repointing
Water is the enemy of every old house, so stopping it getting in comes before anything else. Have the roof checked for slipped or broken slates, failed lead flashing and worn ridge mortar. Most Victorian roofs used Welsh slate on timber battens with no underlay, and a roof that’s had a century of patching may be ready for re-slating. Reuse sound original slates where you can.
Chimneys crack, lean and let water down the flue. Have them repointed, the flaunching around the pots renewed, and disused flues capped with a ventilated cap rather than sealed solid, because a sealed flue sweats. Gutters and downpipes, often cast iron, should run freely and discharge into a working drain, not onto the base of the wall.
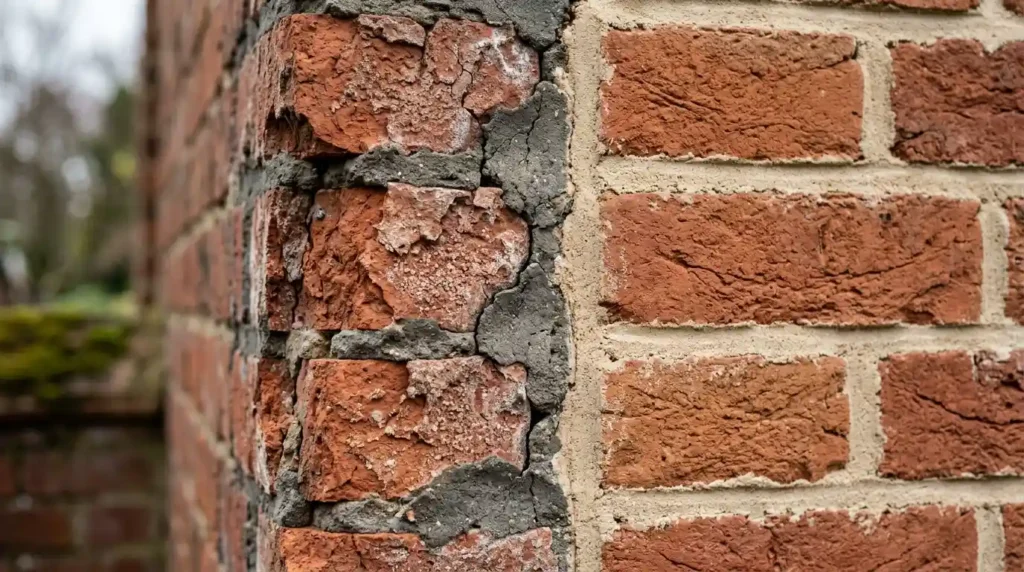
Then the brickwork. Victorian houses were built with lime mortar, which is soft and lets moisture move out through the joints. Repointing in hard cement mortar traps that moisture in the brick, and the brick face then blows off in the frost. It’s one of the most common and most damaging things done to these houses. Repoint in a lime mortar matched to the original, and if the house has been rendered at some point, find out what with. Our rendering team will tell you plainly whether an existing cement render is doing damage and whether a lime render is the right replacement.
Step 2: Fix the damp properly (and why cement and injected DPCs usually make it worse)
Damp in a Victorian house is nearly always one of four things: water getting in from outside, condensation from inside, a leaking pipe or drain, or something bridging the original damp-proof course. True rising damp through the wall is far less common than the treatment industry suggests.
Look for the cause before you buy a cure. Raised external ground levels, a patio or path laid above the DPC, are a classic. So are blocked air bricks under a suspended floor, gypsum plaster taken right down to the floor, a cracked drain, or the neighbour’s downpipe. Fix the source, let the wall dry out, and a lot of “damp problems” go away on their own.
What makes it worse is sealing the wall. Injected chemical DPCs, cement render, waterproof “tanking” paints and gypsum plaster all stop the wall breathing, and a solid brick wall with nowhere for moisture to go pushes it up, inwards, or into the timber. Where a wall does need a new finish, lime plaster and lime render let it dry naturally. Where flooring is going back down, keep the air bricks clear so the void under the boards stays ventilated.
Step 3: Structure and timber: joists, rot, beetle and bay windows
With the water stopped, open things up and look at the timber. Suspended ground floors sit on joists that rest in or on the walls, and where the wall has been damp for decades the joist ends rot. Lift a few boards along the outside walls and check. Woodworm (common furniture beetle) is nearly universal in Victorian roof timbers and floorboards; fresh, pale dust means it’s active, old grey holes usually mean it isn’t.
Bay windows deserve particular attention. Many were built on shallow foundations with a timber lintel spanning the opening, and they drop, crack and pull away from the main wall. Distinguishing old settlement from live movement is a job for a structural engineer, and the repair can range from repointing the cracks to underpinning.
In a terrace, anything you do to the party wall, including removing a chimney breast or inserting a beam, needs the neighbour’s agreement under the Party Wall Act and proper support designed by an engineer. Chimney breasts removed downstairs and left hanging upstairs on a couple of brackets are something we still find.
Step 4: Rewiring, plumbing and heating without wrecking the features
Do all the services before any plaster goes back on. It sounds obvious. It’s still the step people rush past.
Most Victorian houses that haven’t been rewired since the 1960s or 70s need a full rewire. Rubber-sheathed cable becomes brittle and dangerous, and old consumer units have no RCD protection. A good electrician on a period house will run cables through the floor void and up behind skirting rather than chasing through original cornice or picture rails. Our electricians in Nottingham plan routes with the features in mind.
Plumbing follows the same logic. Replace any lead supply pipe, expect old iron waste pipes to be blocked or cracked, and plan pipe runs so radiators sit where they won’t hide a fireplace or a window. The guide on how to replace plumbing in an old house goes deeper into what our plumbing team typically finds. Heating design matters too. Solid-walled houses lose heat faster than modern ones, so size the radiators and the boiler for the actual fabric, not a spreadsheet default.
Step 5: Walls and ceilings: lime plaster, cornices and ceiling roses
Once the services are in, the walls go back. Original Victorian plaster is lime on brick, or lime on timber laths for ceilings and stud walls. Where it’s sound, leave it. Hairline cracks and a bit of hollowness aren’t a reason to strip a whole wall. Where it’s blown or missing, patch or replace in lime, not gypsum. Lime plaster tolerates the small movements and the moisture that an old house lives with; gypsum doesn’t, and it will crack and stain.
Cornices, ceiling roses and corbels can almost always be repaired. Missing lengths of cornice are run in situ or cast from a mould taken off the surviving section. Layers of old paint softened with steam will bring back detail that looked lost.
Lime needs time between coats and won’t cure in frost, so plastering in lime is slower and more seasonal than a modern skim. Build that into the programme. Our plasterers in Nottingham work in both lime and modern systems and will tell you which the wall actually needs.
Step 6: Sash windows and doors: repair, draught-proof or replace
Original timber sash windows can nearly always be saved, and a repaired and draught-proofed sash performs far better than most people expect. A specialist will splice new timber into rotten sections, renew the cords, weights and pulleys, fit brush seals into the frame, and reglaze where needed. In some frames, slim double-glazed units can be fitted into the existing sashes. Secondary glazing on the inside gives you most of the thermal benefit of double glazing while leaving the original window untouched, which is often the only option on a listed house.
Replacing in uPVC is the single change that most reduces the value and character of a Victorian house. If a window really is beyond repair, a new timber sash made to match is the right answer, and in a conservation area or under an Article 4 direction it may be the only permitted one.
Front doors follow the same thinking. A four-panel Victorian door with its original glass is worth stripping, repairing and rehanging. Draught-proofing strips and a decent lock bring it up to modern standards without changing what it is.
Step 7: Floors: floorboards and original hallway tiles
Under the carpet, there are usually original pine boards, sometimes with hardboard nailed over them. Lift the hardboard carefully; the nails leave marks but nothing worse. Boards can be sanded, gaps filled with slivers of reclaimed pine, and damaged boards replaced with reclaimed ones of the same width. Insulating between the joists while the boards are up is one of the easiest energy improvements you can make in a Victorian house, as long as the void stays ventilated.
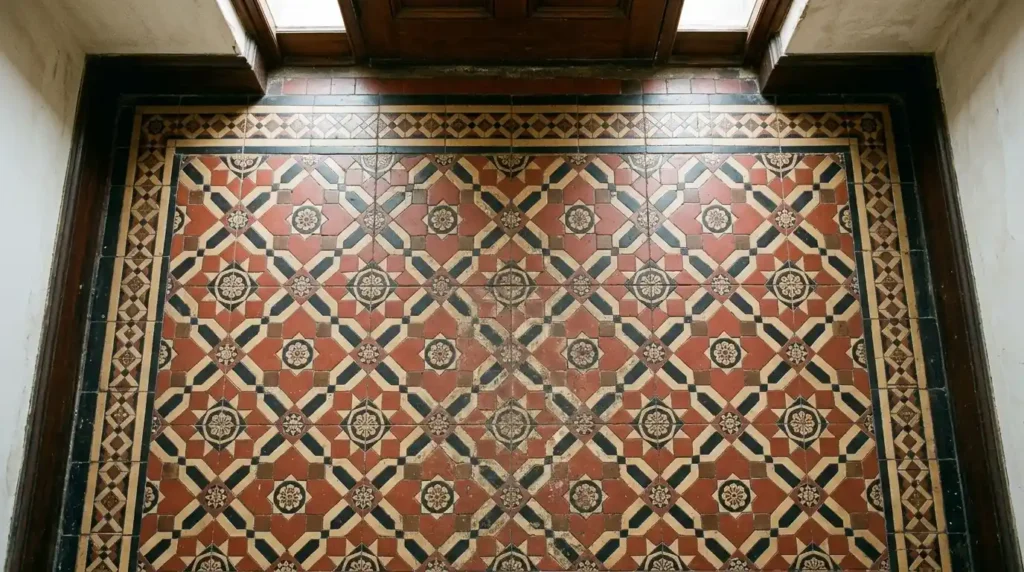
Geometric and encaustic hallway tiles are among the most valuable features a Victorian house has. Clean them with a pH-neutral cleaner and patience, never acid or a pressure washer. Loose or missing tiles can be matched from reclamation yards or from the handful of firms still making reproduction Victorian tiles in the original patterns. During the rest of the works, protect the floors properly; one dropped scaffold pole does more damage than a century of feet.
Step 8: Fireplaces and chimney breasts
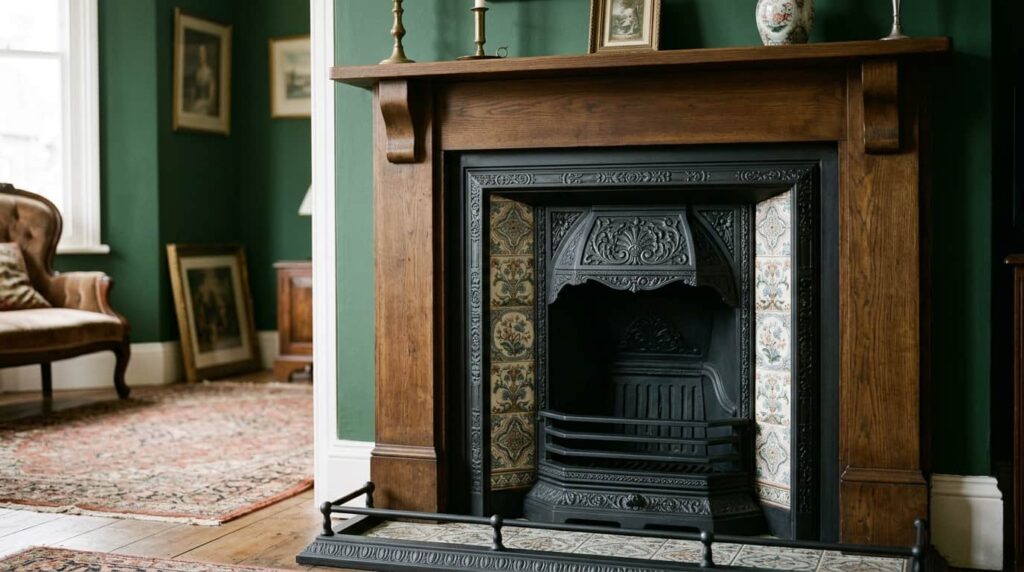
If the fireplaces are boarded over, open them up. You’ll often find the original cast iron insert still there, sometimes the tiled surround too. Cast iron cleans up with a wire brush and stove black; cracked inserts can be welded. Where the fireplace has been ripped out, reclaimed and reproduction inserts are widely available, and a fireplace specialist can size a surround to the original opening.
Have every flue you intend to use swept and smoke-tested before you light anything. Flues you’re not using should be ventilated at both ends, never sealed, or the chimney breast will start to show damp patches within a couple of winters.
Step 9: Decoration: period colours and paints that let the walls breathe
Decoration is the last step, and the paint you choose matters more on a Victorian wall than a modern one. Lime plaster needs a breathable finish: clay paint, limewash, distemper or a modern mineral paint. Standard vinyl emulsion forms a film that traps moisture and flakes off. On external timber and cast iron, a linseed oil paint or a good breathable exterior system lasts longer and moves with the material.
Colour is your call, but the Victorian palette leaned on deep greens, reds, ochres and warm greys, with woodwork often darker than the walls rather than white. Several of the heritage paint ranges publish period colour cards if you want a starting point. If you’re stripping old paint first, our guide to removing paint from any surface covers the methods, and the section on hazards below covers the reason to test that paint first.
Restoring original features: what’s worth saving and where to find replacements
Almost every original feature in a Victorian house is worth saving. The question is usually whether it’s worth saving at the price, and the answer depends on how rare it is and how badly damaged it is.
| Feature | Repair if | Replace if | Where to source |
| Sash windows | Frame is mostly sound, rot is localised | Box frame is rotten throughout | Joinery firm making timber sashes to match |
| Floorboards | Boards are worn, gappy or scratched | Boards are rotten or riddled with active beetle | Reclamation yards (match width) |
| Hallway tiles | Some are loose, cracked or missing | Only if the majority are lost | Salvage yards, reproduction tile makers |
| Lime plaster | Cracked or partly hollow | Detached from the wall over large areas | Lime plasterer, in situ |
| Cornice and roses | Chipped, painted over, short sections missing | Almost never | Cast from surviving sections |
| Cast iron fireplace | Rusty, painted, hairline cracks | Missing entirely | Salvage yards, reproduction foundries |
| Front door | Panels sound, paint layers thick | Structural joints have failed | Reclamation yards, bespoke joinery |
Sourcing reclaimed materials and matching what’s missing
Architectural salvage yards are the first stop for missing fireplaces, doors, tiles and ironmongery. Take measurements and photographs; a fireplace an inch too wide for the opening is no use. For brick repairs, remember Victorian bricks are imperial size, slightly larger than a modern metric brick, so matching means reclaimed bricks or a specialist maker. Mortar colour can be matched by a lime supplier from a sample of the original.
Modern comforts that don’t fight the building
A restored Victorian house doesn’t have to be a cold one. Loft insulation and insulation between the ground-floor joists are easy wins with no downside. Solid walls are harder: there is no cavity to fill, so insulation goes on the inside or the outside, and it must be a breathable system (wood fibre boards and lime, for example) or you’ll create condensation inside the wall. Follow Historic England’s guidance on insulating solid walls and get someone who has done it before.
Kitchens and bathrooms usually sit in the rear addition, where there’s less original fabric to protect, and a kitchen renovation or new bathroom there changes nothing about the character of the front rooms. Underfloor heating can work with a suspended timber floor if it’s insulated properly beneath. And the roof space in most Victorian terraces will take a loft conversion, subject to head height and the Party Wall process.
Common mistakes when restoring a Victorian house
Most of the damage done to Victorian houses in the last fifty years came from good intentions and the wrong materials. Cement pointing and cement render top the list, followed closely by gypsum plaster on solid walls and waterproof paint on the outside; all three stop the building breathing. Ripping out sashes for uPVC comes next, then blocking chimneys and air bricks in the name of draught-proofing.
The process mistakes are just as costly. Starting with decoration and discovering the damp afterwards. Skipping the Level 3 survey to save £1,000 and finding a £15,000 bay window problem. Raising the garden with a new patio and bridging the damp-proof course. Trusting a free damp survey from a company that sells damp treatment. And underestimating how much of the budget goes on things nobody will ever see: the roof, the drains, the wiring and the timber.
How long does it take to restore a Victorian house?
A light restoration that keeps the layout and services and focuses on repair and redecoration typically takes three to six months. A full strip-back, with roof, structure, rewire, re-plumb and lime plaster throughout, usually runs nine to eighteen months, and longer if listed building consent or structural design is involved.
Lime is a large part of why. Each coat needs time to cure, and it can’t be applied in frost, so a project that reaches the plastering stage in November may pause until spring. Living in the house during the work is possible, particularly if it’s phased room by room, but the strip-out and first-fix stages are dusty and disruptive enough that many owners move out for that part.
Looking after a Victorian house once it’s restored
A restored Victorian house stays that way with about an hour of attention a season. Clear the gutters twice a year and check that downpipes run into the drain. Look at the roof after every big storm, from the ground with binoculars if nothing else. Keep the external ground level below the damp-proof course, and don’t let a new flowerbed or path creep above it. Keep the air bricks clear. Have used chimneys swept annually. Repaint external timber and cast iron every five to seven years, before the old paint fails rather than after.
Keep a simple maintenance file with what was done, when, and by whom, including the mortar and paint specifications. The next owner will thank you, and so will you when you need to match a repair in ten years’ time.
If you’re at the start of a Victorian restoration and want an honest view of what the house needs and in what order, get in touch or have a look at our recent projects. The right sequence, the right materials and a realistic budget are most of the battle.
Frequently asked questions
How much does it cost to restore a Victorian house in the UK?
A full restoration of a three-bedroom Victorian terrace commonly costs between £70,000 and £150,000 as of 2026, with lighter repair-and-redecorate projects often falling between £25,000 and £50,000. Roof, structure, rewiring and lime plastering take the largest share. Always hold 15 to 20 per cent in contingency, because Victorian houses hide problems until you open them up.
Where do you start when restoring a Victorian house?
Start with a RICS Level 3 building survey, then make the building weathertight: roof, chimneys, gutters and repointing. Damp and structural repairs come next, then wiring, plumbing and heating. Plaster, windows, floors and decoration come last. Working from the outside in and the top down stops you redoing finished work.
Can you put a damp-proof course in a Victorian house?
You can, but it rarely fixes the problem and often causes new ones. Most damp in Victorian houses comes from leaks, condensation, raised ground levels or bridged original DPCs, not rising damp. Injected DPCs, cement render and waterproof paints stop solid walls breathing. Find and fix the source, then let the wall dry out and finish it in lime.
Is it better to restore or replace Victorian sash windows?
Restore, in almost every case. A repaired and draught-proofed timber sash performs well, keeps the character and value of the house, and costs a fraction of a replacement. Secondary glazing adds most of the benefit of double glazing without changing the window. Replace only when the box frame is rotten throughout, and then with a matching timber sash, not uPVC.
Are Victorian houses expensive to maintain?
Not once they’ve been properly restored. The ongoing cost is mostly gutter clearing, roof checks after storms, chimney sweeping and repainting external timber every five to seven years. Costs climb when maintenance is skipped or when the wrong materials, particularly cement and gypsum, have been used and need reversing.
Is it worth restoring a Victorian house?
For most owners, yes. Well-restored Victorian houses hold their value strongly in period areas, original features are prized by buyers, and the houses themselves are built to last when kept dry and allowed to breathe. The exceptions are houses with severe structural problems or heavy previous modernisation, where the cost of undoing past work can outweigh the benefit.
What are the most common problems with Victorian houses?
Damp caused by cement pointing, raised ground levels or blocked air bricks; rotten joist ends and floor timbers; movement at bay windows; failed roof coverings and chimney flaunching; outdated wiring and lead pipework; and damage from earlier “improvements” such as gypsum plaster, uPVC windows and sealed chimneys. Most are fixable, and a Level 3 survey will identify them before you buy or begin.

2 Responses