
How long does a bathroom renovation take?
A standard family bathroom takes 10 to 15 working days from strip-out to final seal. Move the toilet or bath and you add three to five days. Discover a rotten subfloor and you add more.
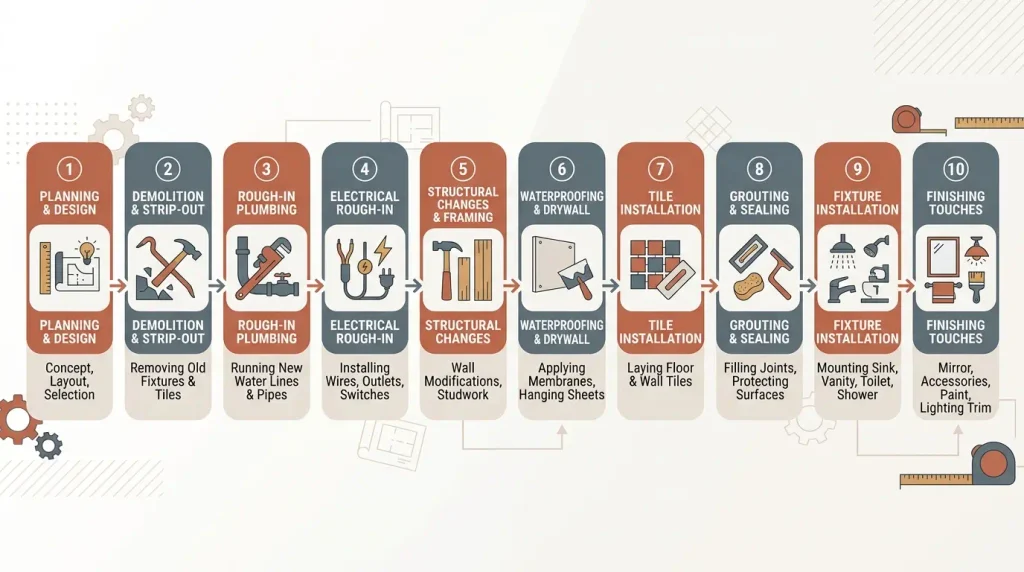
The sequence itself barely changes, whoever is doing the work:
- Plan the layout and order every item before anything is touched
- Strip out the old bathroom
- First fix plumbing and electrics, while the walls and floor are open
- Repair and prepare the subfloor and walls
- Tank the wet areas
- Underfloor heating, if you are having it
- Tile or panel the walls, then the floor
- Fit the bath, shower, toilet, basin and furniture
- Second fix plumbing and electrics, then test everything
- Silicone, snagging and sign-off
What stretches a job is rarely the work itself. It is a vanity unit with a six week lead time, a shower tray that arrives cracked, or adhesive that needs a full day to cure before anyone can grout over it. Almost every bathroom that overruns does so for one of those three reasons, and two of them are avoidable.
Table of Contents
Decisions to make before anyone lifts a tool
The expensive mistakes in a bathroom happen before the first tile goes on. Once the walls are closed up, changing your mind gets costly fast.
Are you moving the toilet, bath or basin?
This is the single decision that most affects the budget and the timescale, so settle it first.
Keeping everything where it is means the existing pipework mostly stays, and a straightforward refit is possible. Moving things means new waste runs, and waste pipes need a consistent fall to work. That fall has to fit inside the floor void, which depends on which way the joists run and how deep they are. On a ground floor with a solid slab it can mean digging.
Moving a toilet is the hardest of the three, because the soil pipe is large and unforgiving. Expect £500 to £2,000 or more for relocations, and expect a good fitter to tell you honestly when a layout you have drawn is not achievable without lifting the whole floor.
Bath, shower, or both
If it is the only bathroom in the house, keep a bath. Removing the last bath in a family home narrows your buyer pool later, and it is the change people most often regret.
In a second bathroom or en-suite, a good shower is nearly always the better use of the space. A walk-in enclosure with a decent tray will get used daily. A small corner bath rarely does.
Order everything before the strip-out starts
Have every item on site, unwrapped, and inspected for damage before day one.
This one rule prevents more delays than anything else on this page. Sanitaryware gets discontinued, shower trays crack in transit, and a tile you ordered in the right quantity turns out to be short once you account for cuts. Finding out on day four, with the room stripped and the family using a neighbour’s shower, is how a two week job turns into a five week one.
Order 10% more tiles than the calculation says. Batch shades vary, and a later top-up order will not match.
Set a contingency you expect to spend
Ten to fifteen per cent, and treat it as likely rather than possible.
Bathrooms hide things. The most common are rotten floorboards under the bath where a seal failed years ago, corroded pipework in older properties, and a soil connection that has been leaking quietly into a joist. None of these are visible until the room is empty, and none of them can be left.
What building regulations apply to a UK bathroom renovation
Most of a bathroom refit needs no permission at all. A few parts have legal requirements attached, and those parts are worth understanding before you agree a price.
Do you need planning permission to renovate a bathroom?
Almost never. Replacing a bathroom inside an existing room is not development, so planning permission does not apply.
The exceptions are narrow. A listed building needs consent for internal alterations. A new external soil or waste pipe on the front elevation can need permission, particularly in a conservation area. And converting a bedroom or box room into a new bathroom is a different matter, because you are adding drainage and ventilation where none existed.
Building control, rather than planning, is what applies to most bathroom work.
What are the bathroom electrical zones?
Bathrooms are divided into zones, and each zone limits what can be installed there. The zone decides the IP rating a fitting needs, which is its protection against water.
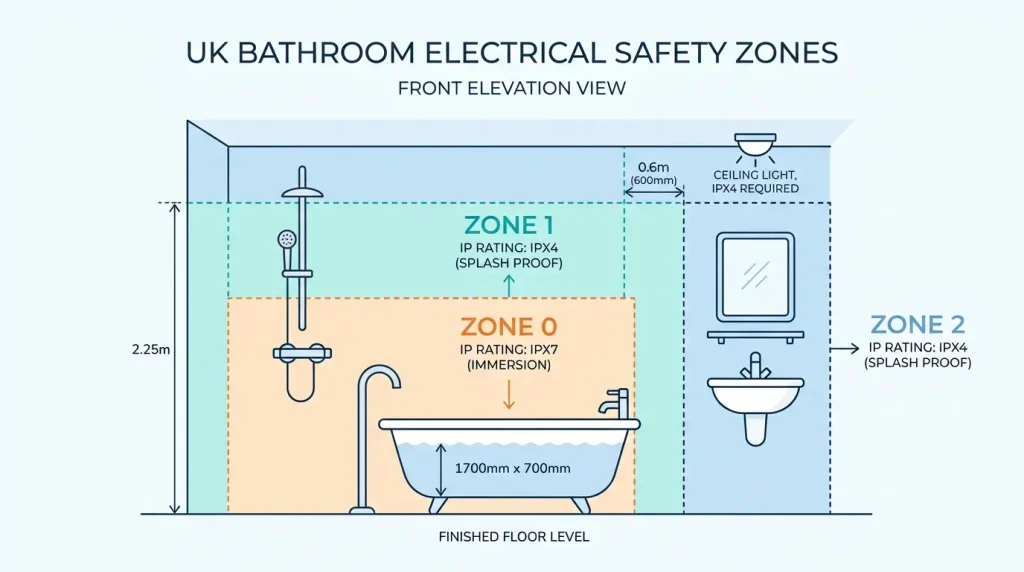
- Zone 0 is inside the bath or shower tray itself. Only 12V SELV fittings rated IPX7 are allowed.
- Zone 1 is above the bath or tray, up to 2.25m from the floor. Fittings need IPX4 as a minimum, and more if a shower jet could reach them.
- Zone 2 extends 0.6m beyond Zone 1, and around a basin. IPX4 minimum again.
- Outside the zones, standard fittings are permitted, though sockets other than shaver units are still not allowed in a bathroom.
Downlights above a shower, a mirror with a built-in light, and a heated towel rail with an electrical element all need checking against these zones before they are bought, not after.
Electrical work in a bathroom is notifiable
In England, installing a new circuit or altering existing circuits within the zones around a bath or shower is notifiable work under Part P of the Building Regulations. Wales applies a wider definition again.
In practice that means one of two routes. Either a registered electrician on a competent person scheme does the work and self-certifies it, or you notify building control yourself and pay for an inspection.
Either way, you should end up holding a certificate. An Electrical Installation Certificate for new circuits, or a Minor Electrical Installation Works Certificate for alterations. If a fitter cannot tell you which one you will receive, that is worth resolving before work starts, not at the end.
What size extractor fan do you need?
A bathroom needs mechanical extraction at a minimum of 15 litres per second under Part F, and that applies whether or not the room has an opening window.
Two details matter more than the fan itself. It has to vent to outside, not into a loft void, which is a surprisingly common shortcut that ends in damp roof timbers. And an overrun timer is worth having, because most of the moisture in a bathroom leaves the room in the fifteen minutes after someone finishes showering.
An undersized or badly routed fan is the root cause of most black mould that reappears no matter how often it is cleaned.
Stripping out the old bathroom
With the planning settled, the physical work begins, and it begins with taking everything out.
Isolate the water and power first
Find the stopcock and confirm it actually shuts off before you need it. In older houses they seize. Isolate the lighting and any shaver or fan circuits at the consumer unit, then prove them dead rather than assuming.
If there is a shower with an electric supply, that circuit needs isolating separately.
Take things out in the right order
Mirrors and accessories, then the shower screen, then tiles, then the basin, then the bath. The toilet comes out last, because you will want it available for as long as possible and it takes ten minutes to remove.
Cap every pipe as you go. An open waste is an open route for drain smells into the house, and it will be days before anything reconnects.
What you often find underneath
Pre-2000 properties in particular tend to hold a few surprises.
Rotten or soft floorboards under the bath and around the toilet are the most common, usually from a seal that failed years earlier. Lead or steel pipework may need replacing rather than reusing, and if you are dealing with pipework in an older house it is far cheaper to do it now than after the tiling.
Textured coatings such as artex on ceilings, if the property predates 2000, may contain asbestos. Do not sand or scrape it. Have it tested, and if positive, use a licensed contractor.
First fix plumbing and electrics
This is the stage most homeowners have never heard of, and it is the one that cannot be revisited without undoing everything on top of it.
What first fix means
First fix is everything that has to sit inside the walls and floor before they are closed up. Hot and cold supply pipes, waste runs, the shower valve body, cables for lights, the fan, the shaver socket and any underfloor heating.
Nothing is connected to a visible fitting yet. The room will look worse at the end of first fix than it did at the start, which unnerves people, and it is completely normal.
Set out from the actual fittings
Measure pipe and cable positions from the sanitaryware you have on site, not from the brochure dimensions. Waste heights on basins and wall-hung toilets vary between manufacturers by enough to matter.
Then photograph every wall and the whole floor before anything is boarded over. When someone needs to drill in two years’ time, those photographs are the difference between a clean fixing and a punctured pipe.
Get the waste falls right
Waste pipes need a consistent fall towards the soil stack. Too shallow and they block. Too steep and the water runs away faster than the solids, which also blocks.
Fit isolation valves on the supplies to the basin, toilet and any bidet while the walls are open. They cost very little and they mean a future tap washer can be changed without draining the system.
Preparing and waterproofing the surfaces
Skipping or rushing this stage is the most common reason a bathroom that looked perfect fails within a few years.
Make the floor and walls sound
Tiles are rigid and unforgiving. Any movement underneath them cracks the grout first and the tiles second.
Replace any soft or damaged floorboards rather than patching over them. On a timber floor, overboard with a suitable tile backer or use a decoupling membrane. In wet areas, tile backer board is a better substrate than standard plasterboard, and moisture-resistant plasterboard is not the same thing as a waterproof one.
Walls need to be flat before tiling. Tiling over a bowed wall shows in every joint.
Do you need to tank a shower?
Yes, in any enclosure or wet room. Tanking is a waterproof membrane applied to the walls and floor before tiling, and it is what stops water reaching the structure behind.
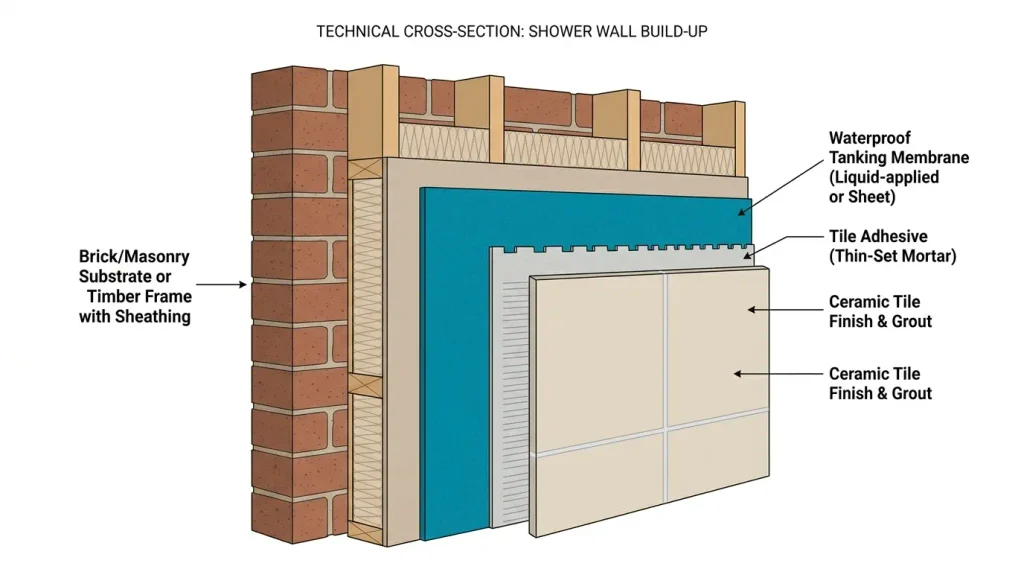
Tiles and grout are not waterproof. Grout is porous and silicone eventually fails, so water will get through in a shower area, and tanking is what catches it. In a wet room where the whole floor drains, it is not optional at all.
Away from the shower, behind a basin or along a bath splashback, tanking is a sensible precaution rather than a necessity.
Underfloor heating goes in now
If you want underfloor heating, it is fitted at this stage or not at all. An electric mat under the tiles is the usual choice for a domestic bathroom, at roughly £300 to £600 for a typical room, and it needs its own supply and a thermostat.
Test the mat with a meter before tiling, and again after. A damaged element found after the floor is down means lifting the floor.
Tiling, flooring and finishes
With the substrate sound and the wet areas sealed, the room starts to look like a bathroom again.
Tiles or panels
Tiles last longer, cost more in labour, and need grout maintenance. Panels go up in a day, have no grout lines to discolour, and suit a rental or a fast turnaround well.
Tiling runs roughly £40 to £80 per square metre supplied and fitted. If you are weighing the options, the tile materials and panelling comparisons cover the choice in more detail than belongs here.
Set out from the most visible line
Start tiling from the line the eye lands on first, usually the main wall as you enter or the run above the bath, and work outwards so any cut tiles finish in the corners.
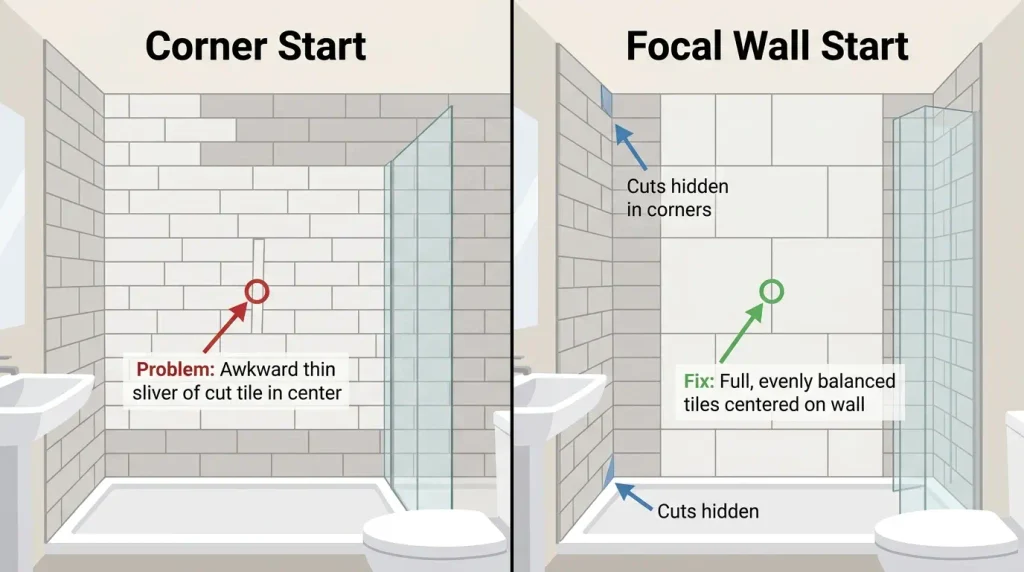
Tiling from the corner because it seems logical is what produces a thin sliver of tile in the middle of the most visible wall. Dry-lay the first row before mixing any adhesive.
Let things dry properly
Adhesive needs its full curing time before grouting, and grout needs its time before silicone or water. The times are on the bag and they are not optimistic estimates.
This is the stage where a rushed job shows up six months later as cracked grout and lifting tiles. There is no way to speed it up, and a fitter who tells you otherwise is managing their schedule rather than your bathroom.
Fitting the sanitaryware and second fix
The order to fit in
Bath first, because it is the largest and the most awkward to manoeuvre. Then the shower enclosure, the toilet, the basin and any furniture.
Take the protective film off later rather than sooner. A cast iron bath is heavy enough that two people are the minimum, and a chipped enamel edge on day nine is an unwelcome way to finish.
Second fix and testing
Second fix connects everything: taps, wastes, the shower head and valve trim, the toilet seat, lights, the extractor fan and the shaver socket.
Then test properly, and test under real conditions. Fill the bath to the overflow and drain it while checking the waste underneath. Run the shower at full flow for several minutes. Flush the toilet repeatedly. Check every light and run the fan. Most leaks show up under load, not under a trickle.
Silicone last, and with the bath full
Fill the bath with water before you seal around it, and leave it full until the silicone has cured.
A bath drops several millimetres under the weight of water and a person. Seal it empty and the joint tears the first time someone uses it, which is the single most common cause of the leak that appears six months after a renovation finishes.
Signing off and the paperwork you should have
A bathroom is not finished when it looks finished. Before the final payment, make sure you hold:
- The electrical certificate, either an Electrical Installation Certificate or a Minor Works Certificate
- Building control notification or a competent person scheme certificate where notifiable work was done
- Manufacturer warranties registered, particularly for the shower valve and any concealed cistern
- A note of where the isolation valves and stopcock are
Then snag the room in daylight. Check every silicone line, that all doors and drawers align, that the toilet is secure, and that nothing rocks.
The mistakes that cost the most to fix
- Tiling before the subfloor was made sound. The tiles crack, and fixing it means lifting the floor.
- No isolation valves. Every future tap repair drains the whole system.
- A fan that is undersized or vented into the loft. Persistent mould, and eventually damp roof timbers.
- Ordering after the strip-out began. The most common cause of a bathroom out of use for a month.
- Sealing around an empty bath. A hidden leak that appears months later.
- Skipping tanking in a shower. Water reaches the wall behind, and the damage shows up as blown plaster in the next room.
Should you do it yourself or hire a fitter?
A competent DIYer can genuinely handle the strip-out, the tiling, the decorating and some of the second fix. Those stages are slow rather than difficult, and doing them yourself takes a meaningful amount off the labour bill.
Three parts should not be DIY. Notifiable electrical work, because of the certification. Soil pipe alterations, because getting the fall wrong is expensive and unpleasant. And tanking a wet room, because there is no way to inspect it once the tiles are on.
If you are hiring, a complete quote should name the strip-out and waste disposal, first and second fix separately, subfloor preparation, tanking, tiling with a tile allowance, and who is supplying what. A quote that is a single figure with no breakdown is very hard to compare, and usually hides the stages that get skipped. It is also worth checking what a bathroom renovation typically costs before you review quotes, so you know whether a number is realistic. A medium family bathroom generally lands between £5,000 and £8,000, with small en-suites lower and full remodels with layout changes considerably higher.
Buon Construction fits bathrooms across Nottingham and the wider East Midlands, and handles the plumbing, electrics and tiling under one job rather than leaving you to coordinate three trades. If you want a proper breakdown rather than a single number, get in touch.
FAQs
Can you use the bathroom while it is being renovated?
Not once the strip-out starts. If it is your only bathroom, expect to be without it for the full 10 to 15 days. Some fitters will leave the toilet connected until the last possible stage and reconnect it overnight, so it is worth asking. Otherwise plan for alternative arrangements from day one.
Can you keep the existing pipework and just change the sanitaryware?
Often, yes, if the layout is not changing and the pipework is in sound condition. Copper in good order can usually stay. Corroded steel, old lead, or pipework already showing green staining at the joints should be replaced while the walls are open, because doing it later means removing the tiling.
Does a new bathroom add value to a UK home?
It rarely returns its full cost as added value, but a dated or poor bathroom actively puts buyers off and slows a sale. A clean, well-fitted bathroom is better understood as protecting the asking price than increasing it. Overspending on a premium suite in an average property does not usually pay back.
Do you need to tell your home insurer about a bathroom renovation?
For a straightforward refit, usually not. Tell them if the property will be unoccupied during the work, if structural alterations are involved, or if the job runs beyond a few weeks. Policies vary, and an unreported renovation can affect a later water damage claim, so a quick call is worth the time.
Should you paint before or after tiling?
Mist coat and first coat before tiling, then the final coat after grouting and silicone are done. Painting first protects you from adhesive splashes on fresh paintwork, and the final coat afterwards covers any marks from the tiling. Leave the ceiling until last either way.
Do you need permission to renovate a bathroom in a flat?
Often yes, and it is separate from planning. Most leases require the freeholder’s written consent for alterations, and many restrict hard flooring or work affecting communal soil stacks. Check the lease before ordering anything, because retrospective consent is far harder to obtain than consent asked for in advance.
